
🔐 API Keys Management
Securely manage your exchange API keys for automated trading
🔑 Add New API Key
Enter your exchange API credentials below

ByBit Exchange
Add your ByBit API Key
BitMEX Exchange
Add your BitMEX API Key

Deribit Exchange
Add your Deribit API Key
This process can take up to 60 seconds to complete.
60 seconds
Loading your API Keys...
No API Keys Added Yet
Click on one of the exchange buttons above to add your first API Key and start trading!

Edit API Key
ByBit API Keys need to be created using the following sequence of steps
Login to the ByBit website on your Computer on the website as there is no option to
create API Keys on the ByBit App. You must use the ByBit website.
Please Note : You will need to set up a Sub Account to use ByBit on Auto Prophets.
The steps are easy, just follow the instructions below.
Important
You must create a New Sub Account on ByBit. Do not use an existing account. This ensures the Sub Account settings will work with the latest ByBit upgrades. Old Sub Account may need you to go through upgrades. Please work through each step below and ensure your screen looks the same as the screenshots provided.
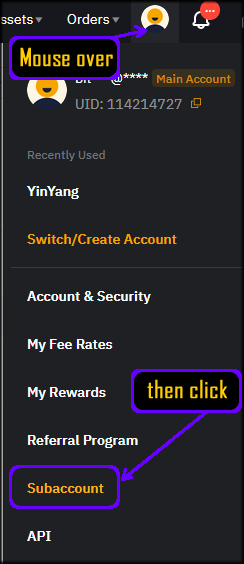
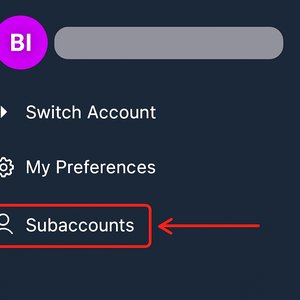
Step 1. Once logged in, then put your mouse over the User Icon in the top right area and then click on Subaccount.
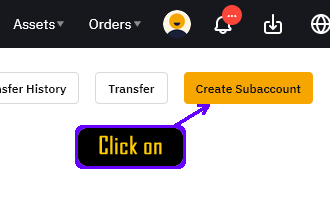
Step 2. and then in the top right corner click on "Create Subaccount".
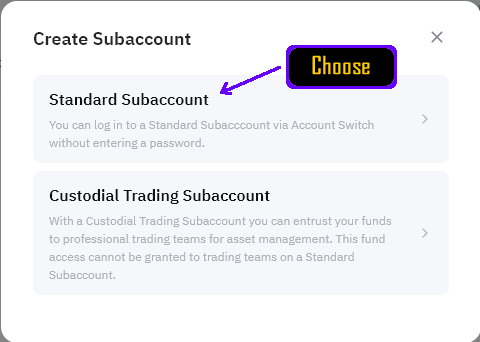
Step 3. Click on and choose Standard Sub Account.
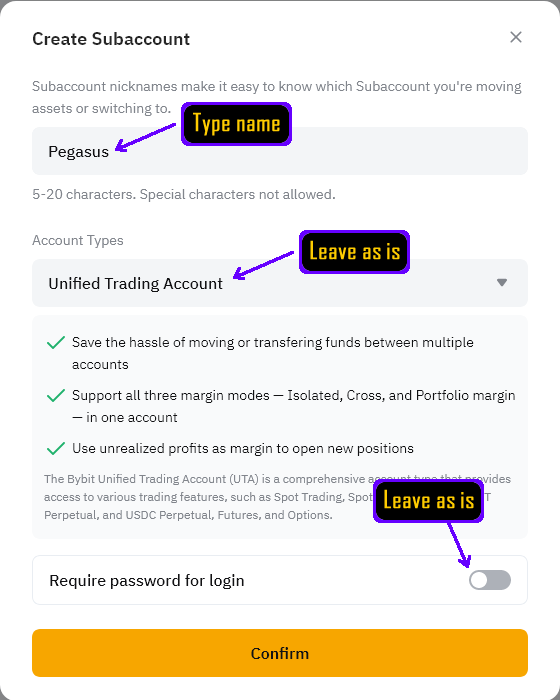
Step 4. Enter a Name for the Sub Account and click on Confirm. The name can be anything but cannot have spaces or special characters, only alphabet and numbers.
Step 5. Complete the email and 2FA verification process by clicking "Send Verification Code" to receive an email with a 6-digit code. Check your email inbox for the verification code from ByBit and enter the 6-digit email verification code along with your 2FA (Two-Factor Authentication) code from your authenticator app.

Step 6. Your sub account has been successfully created! You can see your newly created sub account in the list. Locate the "Management" button for your sub account and click on "Management" to access the sub account settings. This will allow you to create the API Key for this sub account.

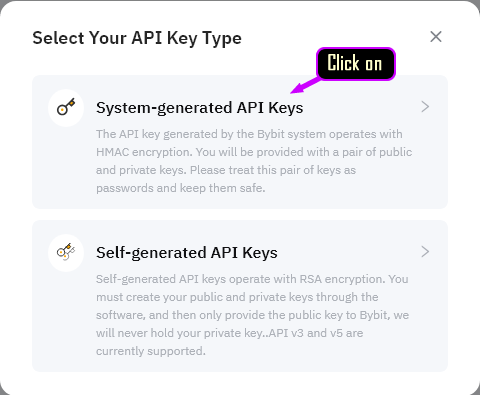
Step 7. Click on "Create New Key" to start creating your API Key. You'll be presented with the API Key creation form.

Choose the "System-generated" API Keys to continue.
Step 8. Now you will see the area to enter the New API Key settings. See the settings in details listed below which when entered should look like the image below.
Enter Name for API Key as "Auto Prophets" or something like this for your records only.
Choose "Read-Write" API Key Permissions.
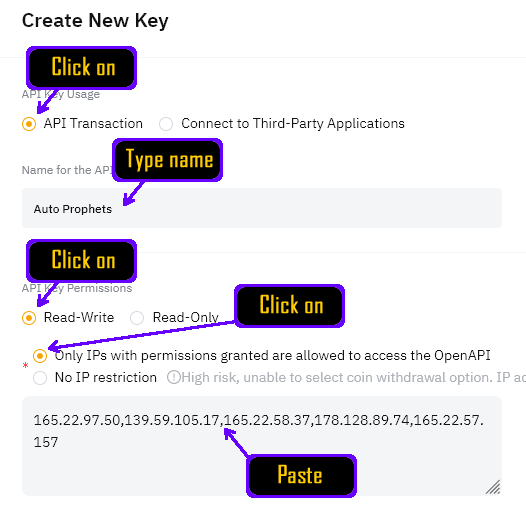
Choose "Only IPs with permissions granted...." option.
Copy n paste these IPs into the Trusted IPs area.
Once the IPs are pasted into the IPs area it should then accept the IPs and look like the image above.
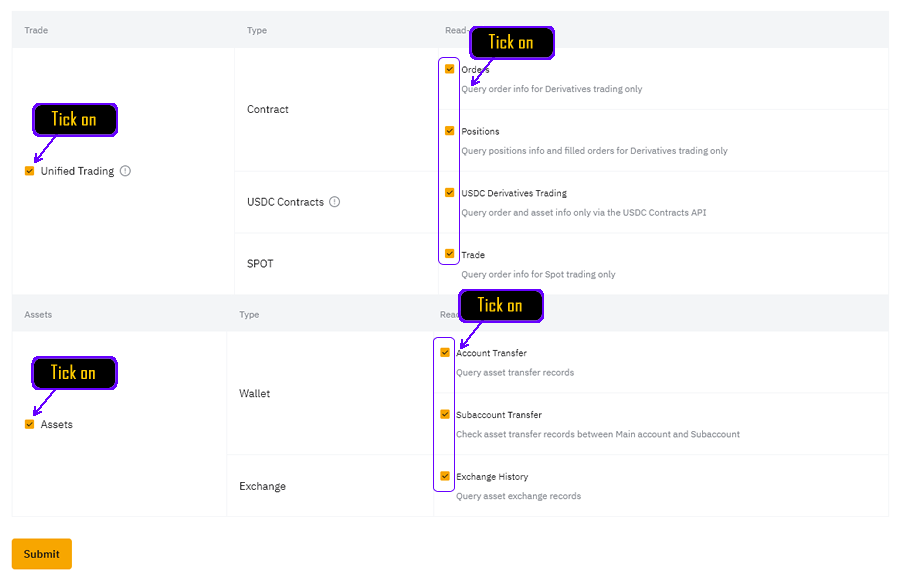
Step 9. Next, scroll down to where we need to make sure you tick on "Unified Trading" and "Assets". This should automatically tick all options for each one and it should look like the image below. If your screen shows "Withdrawal" then "untick" this. Every other permission is needed except Withdrawal.
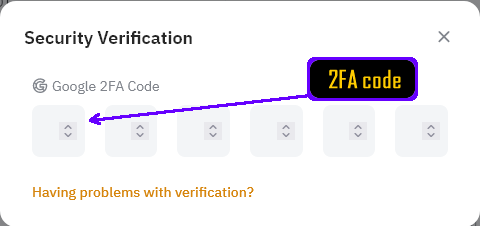
Step 10. After ensuring all the details and settings are correct, click on the Submit button to proceed. You will be now required to perform a Security Verification to complete the API Key creation. Enter your ByBit Main Account 2FA Code. Additionally, you may be required to have a Verification Code sent to your email and will need to copy this as well.
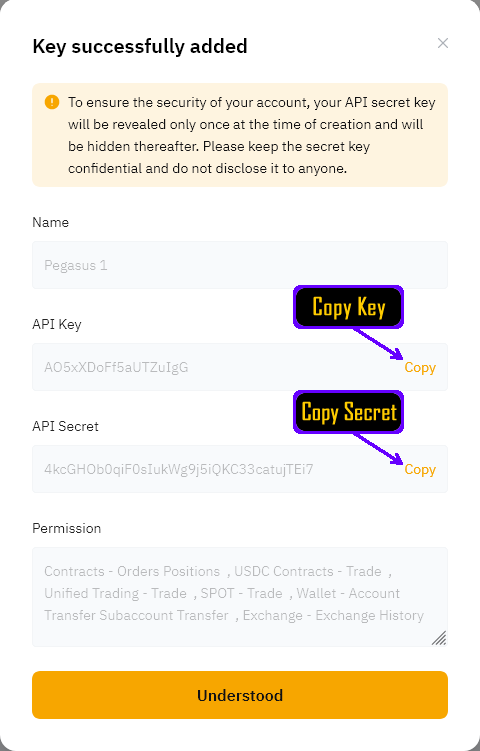
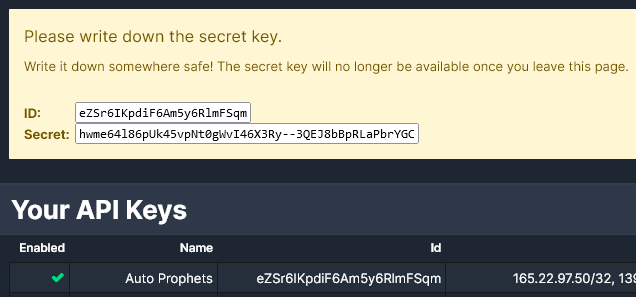
Step 11. You should see a screen like the image below and be able to Copy and Paste the API Key and API Secret into the Auto Prophets website below and complete adding the API Key to the Auto Prophets website by clicking on the "Add New API key" below. Please note: The API Secret is only shown this one time before you click on "Understood". So you must copy this now and paste below in the Auto Prophets website and then come back to Step 12 after.
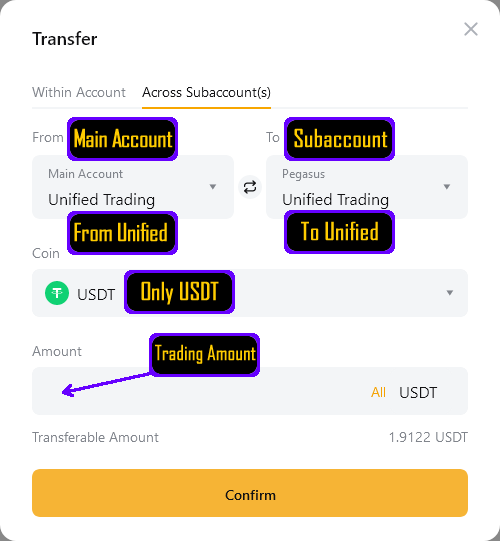
Step 12. Once you have completed the above, you will need to check that you have your Balance you want to use for Trading in your "Unified" Trading Account. If you transfer into the "Funding" account, then your Auto Prophets will not see this to be able to trade with. Ensure you only transfer USDT or USDC into "Unified Trading". Please note, when you first make a deposit to ByBit, you might find the deposit amount will be in your "Funding Account" and need to be "Transferred" into your "Unified Trading Account". Good luck, you are now ready! Click on "Angels" in the navigation at the top of the screen and then click on "Start New Angel" and you will be Flying in no time!

Binance API Keys need to be created using the following sequence of steps
Step 1. Enable 2 Factor Authentication. Go to the Security page in your Binance Account and ensure you have set up 2FA.
Step 2. Now find in the User Center -> "API Management" and then click on it.
Step 3. Now click on "Create API". You will then be asked a choice and need to choose "System Generated" to continue.
Step 4. Now give the API a Nickname (can be anything like Auto Prophets) and once you have added the Key, you will see in the top right area a button that says 'Edit Restrictions' that you will need to click on. Once you have clicked on this button, you will be able to enter the details below.
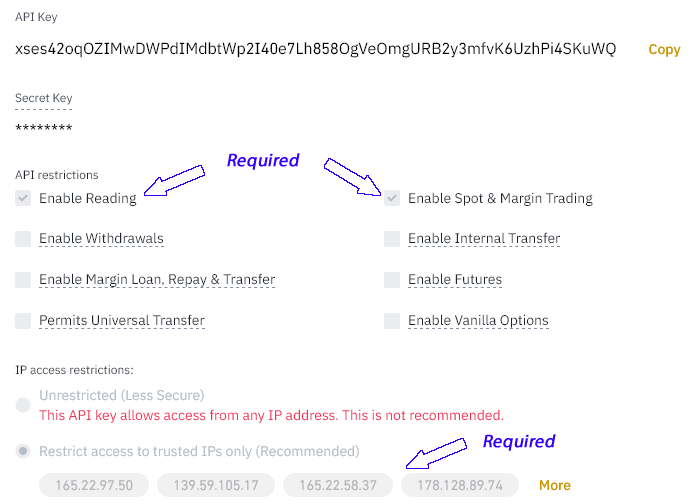
Step 5. Click on the option that says "Restrict Access to trusted IPs"
Step 6. Make sure you tick on "Enable Reading" and "Enable Spot & Margin Trading"  (ticked)
Make sure Withdraw is Disabled (unticked)
BitMEX API Keys - Complete Step by Step Instructions
Follow these steps carefully to create a secure API Key for BitMEX
🛡️ Critical Security Notice
Always ensure you have setup a Sub Account to use for your Trading on Auto Prophets. BitMEX API Keys should only be created on Sub Accounts and with Order permissions only. Ensure you use the exact IP addresses provided below for maximum security.
⚠️ Important Limitation
Backup Plan Not Available: BitMEX does not have a "Funding" account within the sub-account structure like ByBit does. Therefore, the Backup Plan feature is not available for BitMEX customers. All other Pegasus features are fully supported.
Step 1. Create Sub Account - Begin by creating a dedicated sub account for Auto Prophets trading. Log into your BitMEX account at www.bitmex.com. In the top right corner, click on your account menu (circular icon), then from the dropdown menu, click on "Subaccounts".
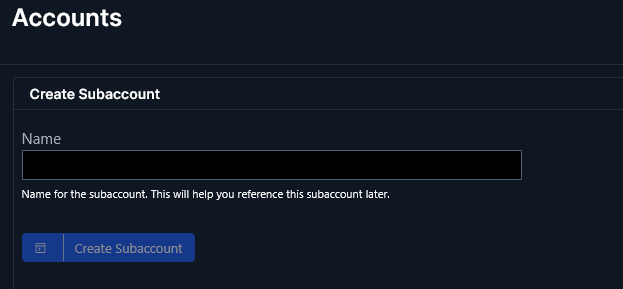
Step 2. Configure Sub Account Settings - Click "Create Subaccount" and enter a descriptive name (e.g., "Pegasus Angel"). Using a dedicated sub account for Auto Prophets ensures better security isolation and easier account management.
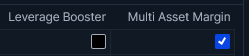
Step 3. Sub Account Settings - Now your newly created sub account will appear in the Sub Account Menu. Leave the Leverage Booster unticked (disabled), but tick (enable) Multi Asset Margin which allows your Pegasus Angel to operate and take full advantage of the exchange.
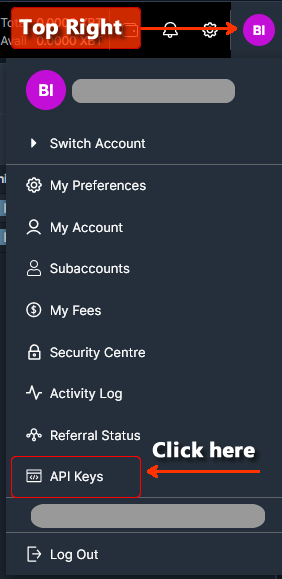
Step 4. Access API Key Management - Navigate to the API Key management section. From the dropdown menu, click on "API Keys". This will take you to the API Key management section where you can create and manage your API Keys.
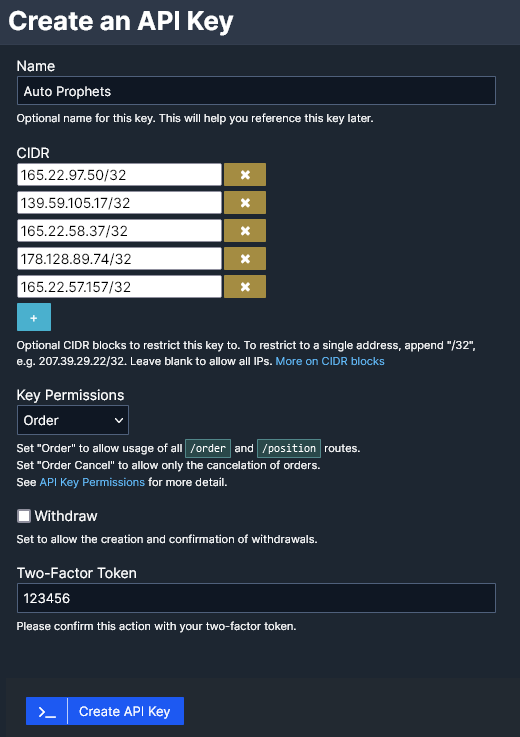
Step 5. Configure and Create API Key - You will see the API Key creation form. Fill in the details exactly as specified below:
📝 Configure API Key Settings:
Enter the trusted IP addresses provided below. This ensures maximum security for your account.
Step 6. Save Your API Credentials - Once your API Key is successfully created, you will see a confirmation screen. CRITICAL: Copy both the API Key ID and Secret immediately, as the Secret will only be shown once! If you lose the Secret, you'll need to create a new API Key.
Step 7. Add to Auto Prophets - Now scroll down to the "Add New API Key" section below these instructions and enter your API details:
• 📝 Nickname: Enter a name for your API Key (e.g., "My BitMEX Account")
• 🔑 API Key: Paste the API Key ID you copied from BitMEX
• 🔒 API Secret: Paste the API Secret you copied from BitMEX
Then click "Add BitMEX API Key" to complete the setup. The system will verify your API Key and confirm successful addition.
Step 8. Test Your Setup - Once added successfully, verify your BitMEX API Key is working correctly by checking that you can see your BitMEX account balances in your Auto Prophets dashboard. The system will automatically validate that your API Key has the correct permissions and is properly configured for subaccount trading.
BitMEX Specific Features & Limitations
Available Markets: XBTUSD (Bitcoin)
Supported Features: ✓ Dollar Cost Averaging, ✓ Target Leverage, ✓ Stop Loss, ✓ Trailing Take Profit
Not Available: ✗ Backup Plan (requires manual balance management)
Since BitMEX doesn't support the Backup Plan feature like ByBit does, use conservative leverage and monitor your Angels regularly.
Deribit API Keys - Complete Step by Step Instructions
Follow these steps carefully to create a secure API Key for Deribit
🛡️ Critical Security Notice
Always ensure you have setup proper API Key permissions and use the exact IP addresses provided below for maximum security. Deribit API Keys require Client ID and Client Secret instead of standard API Key/Secret.
⚠️ Important Limitation
Backup Plan Not Available: Deribit does not have a "Funding" account within the sub-account structure like ByBit does. Therefore, the Backup Plan feature is not available for Deribit customers. All other Pegasus features are fully supported.
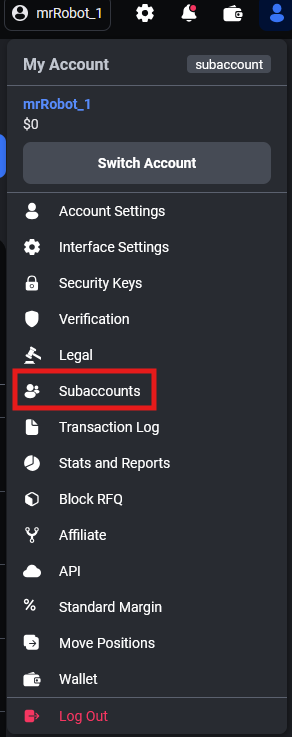
Step 1. Login to Deribit - Begin by logging into your Deribit account at www.deribit.com. Navigate your mouse to the top right of the screen and you will see the screenshot below where you can click on "Subaccounts" where we will first make a Sub Account for you to use that is isolated and firewalled from your main account. Ensure you are in the Main Account when trying to create a Sub Account.
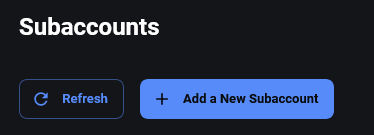
Step 2. Click on "Add a New Subaccount" - You should now see your new Sub Account creation page. Click on the "Add a New Subaccount" button to create a dedicated subaccount for Auto Prophets trading.
Step 3. Access Your New Sub Account - You should now see your new Sub Account in the list. Ensure you are in the Sub Account you just created by clicking on the right arrow in a box icon like you see here  next to it under the "Actions" column. Clicking on this lets you then be logged into the Subaccount where you can now create the API Key for this Sub Account.

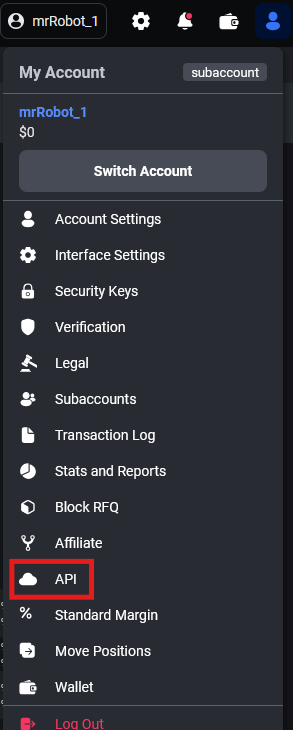
Step 4. Navigate to API Management - Now that you are logged into the Sub Account, it is time to add an API key for that subaccount. Navigate your mouse to the top right of the screen and you will see the screenshot below where you can click on "API" to create a new API Key for this Sub Account.
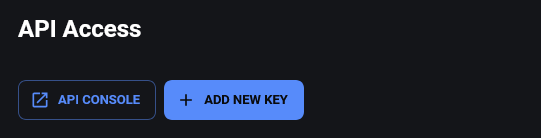
Step 5. Add New API Key - You will now see the list of API keys for this subaccount and also the "Add New Key" button that you need to now click on.
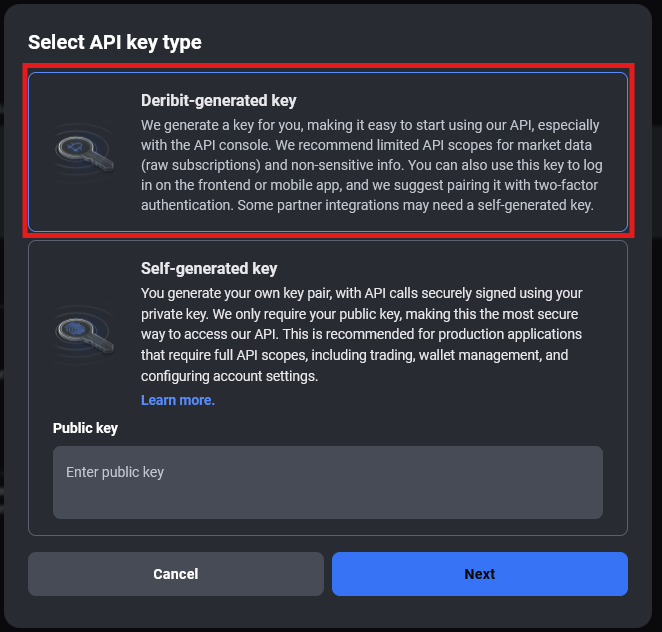
Step 6. Choose API Key Type - You will now be asked to select the API Key type. Choose "Deribit-generated key" and then click on the "Next Step" button.
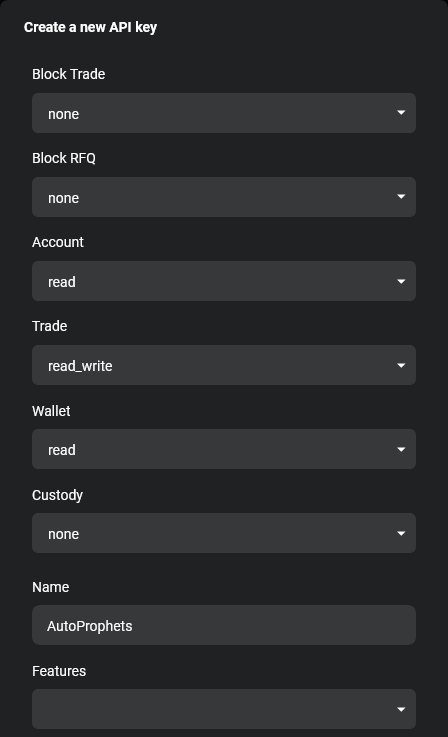
Step 7. Configure API Key Permissions - You will now see the "Create a new API key" form. We need to configure it properly with the exact permissions required for Auto Prophets trading.
📝 Configure API Key Permissions - Use Dropdown Selections:
NEVER select "read" or "read_write" for Custody permissions! This will be REJECTED by our security system. Only SUBACCOUNT API keys are allowed - main account API keys will be rejected for security.
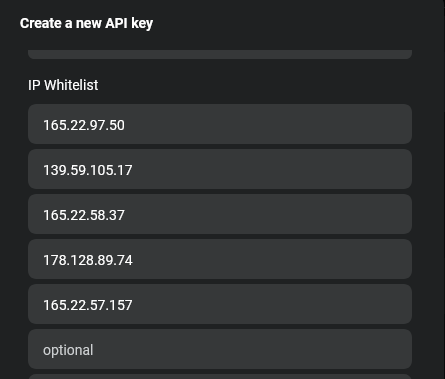
Step 8. Configure IP Whitelist - After setting the permissions above, scroll down in the same form to find the IP Whitelist section. This is a critical security feature that ensures only our trusted servers can access your API Key.
After setting the permissions above, scroll down in the same form to the IP Whitelist section and enter the trusted IP addresses provided below. This ensures maximum security for your account.
Step 9. Create the API Key - After entering all the permissions and IP addresses, scroll to the bottom of the form and click "Create a new API Key" to complete the setup. Make sure you have reviewed all settings before clicking this button.
After entering all the permissions and IP addresses, scroll to the bottom of the form and click "Create a new API Key" to complete the setup.
Step 10. Copy Your API Credentials - After clicking "Create a new API Key", you will see your new API Key appear in the API Keys list. Click on the Client ID (the long string of letters and numbers) to copy it to your clipboard. Then click on the Client Secret to copy it as well.
You can edit your API Key permissions at any time by clicking on the pencil icon  next to your API Key in the list. This allows you to modify permissions or update the IP whitelist if needed.
